Controlling the calendar from a FileMaker script step

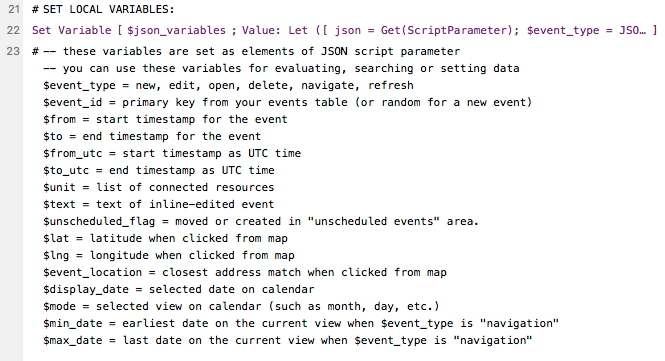
You can navigate the calendar, get information about the calendar or change calendar data using a FileMaker script step.

The soSIMPLE Calendar Add-on adds some useful utilities for interacting with your calendar using the FileMaker script step, “Perform JavaScript in a Web Viewer.” These functions give you the tools you need to bridge features from the calendar into the rest of your workflow.

Using the FileMaker script step

Whether you’d like to change the calendar to a different view, or you want to make your own set of navigation tools, this reference will tell you what you need to know.

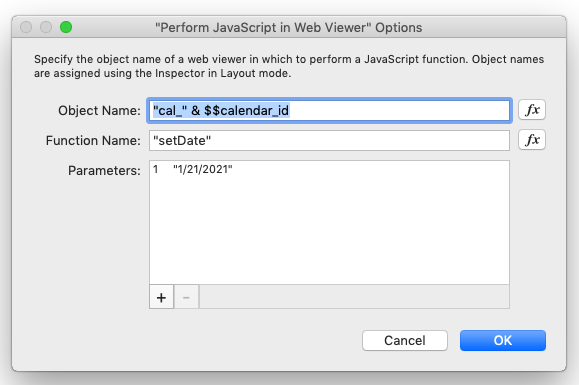
To make use any of these commands, use the “Perform JavaScript in Web Viewer” script step.

This example script step will navigate the calendar to January 21, 2021. Notice the quotes around the date.

When using this script step:

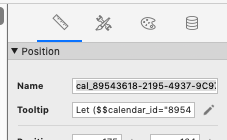
  • The Object Name is the name of the Web Viewer that contains the calendar. You can either go into layout mode and look at the info panel to get that name, or you can use the formula “cal_” & $$calendar_id
  • The Function Name can be any of the JavaScript functions shown below. Please note: the functions are all case-sensitive.
  • The expected Parameters are shown in parenthesis. If there are no parameters shown, leave this section blank.
The Object Name is the Name on the info panel

What calendar tools are available?

  • goPrev ( ) – go to the previous date, depending on the view shown (previous day, previous week, previous month, etc.)
  • goNext ( ) – go the next date, depending on the view shown
  • setMode ( mode_name ) – go a specific view, or mode, on the calendar. See the available modes below.
  • setDate ( date_string ) – go to a specific date
  • setState ( date_string, mode_name ) – go to a specific date and view/mode in one step
  • getState ( ) – Find out what date and mode you’re currently showing. This useful utility step will automatically run the FileMaker Script “soSIMPLE Calendar Actions” with the parameters: event_type=”get state”, mode, max-date, min-date, and display_date. You can then use the Action script to set controls or variables for your custom app.
  • showSpinner ( ) and hideSpinner ( )
    (new for Add-on 1.1) Manually show and hide a progress bar in the middle of the calendar. Good for long-running load events, to let the client know it might take a few seconds.

Available modes (or views):

  • day, week, month, year,
  • unit (single day, resources along the top)
  • week_unit ( planner: one week resources along the top)
  • timeline (variable-sized timeline, resources along the left)
  • timeline_day, timeline_week, timeline_month, timeline_year
  • week_agenda, week_column
  • map, map_day, map_week, map_month, map_year
  • grid (future events in a grid)
  • grid_day, grid_week, grid_month, grid_year

These are more advanced functions, which you can see in use in the scripts “soS Calendar Load Events” and “soS Calendar Load Resources”:

  • loadResources ( resource_list [, append=false ] )
    Loads resources on calendar for resource and timeline views. Can also be used to sort or filter existing lists. Resource_list parameter is a JSON-formatted list of resource objects in the format as shown in the article Integrating your Own Resources. You can also send a second parameter as True to append the resource_list to an existing list. (Used in the FileMaker Script “soS Calendar Load Resources).
  • loadEventObject ( event_object )
    Loads or reloads a single event on the calendar. The event_object parameter is a single event in the format shown below. (Used in the FileMaker Script “soS Calendar Load Events).
  • loadEventObjectArray ( event_list )
    Loads or reloads a list of events on the calendar. The event_list parameter is a list of event objects. (Used in the FileMaker Script “soS Calendar Load Events).
  • removeEventObject ( event_object [, event_list] )
    Removes an event object from the calendar display. Does not delete it from the data source. (Used in the FileMaker Script “soS Calendar Load Events).
  • showEvent ( event_id [, effect ] )
    Shows an event on the calendar that’s already been loaded, which may navigate to the correct date to show it. Effect can be “show”, “highlight” or “animate”. Show will navigate to the event, highlight will draw a rectangle around it, and animate will draw the rectangle then fade it away after 3 seconds. (Important note: you can only showEvent for events that have been loaded since the last refresh).
  • reloadAll ( )
    Reloads all the events for the current view. Performing this JavaScript will automatically run the FileMaker Script “soSIMPLE Calendar Actions” with the parameter event_type = “refresh” (or the script configured for calendar navigation in soSIMPLE Calendar Settings if you’ve changed it ).

The soSIMPLE Event Object

{
	"id" : "97FADBDA-F9E3-4258-90B2-B7AF0E05D784",
	"start_date" : "01/02/2003 21:00",
	"end_date" : "01/02/2003 22:00",
	"text" : "Text of Event, inline-editable",
	"details" : "<strong>FORMATTED</strong> event, frequently from a calculation",
	"tooltip" : "<strong>FORMATTED</strong> tooltip <br />frequently from a calculation",
	"color" : "#34A0F4",
	"textColor" : "",
	"unit" : "123¶321",
	"readonly" : "",
	"unscheduled_flag" : ""
	"event_location" : "",
	"lat" : "",
	"lng" : "",
	"event_display_type" : "normal",
	"event_height" : "",
	"recordId" : "2",
}
  • id is always unique
  • id, start_date, end_date and text are required
  • details is what shows on your calendar, text is only for in-line editing option.
  • text, details, and tooltip can be formatted using HTML tags, or the GetAsCSS( ) function.
  • color and textColor can be any CSS-valid format – by name, hex code, rgb, rgba, etc.
  • unit is a return-separated list of resources assigned to the event. The resources can be keys or names, depending how they’re stored in the event record.
  • readonly set to 1 (one) will render an event un-draggable
  • unscheduled set to 1 (one) will show the event in the unscheduled panel of the calendar in all views, if you’re using that feature, regardless of the start & end time.
  • event_location is the address of the event. When the feature is turned on, soSIMPLE will use this field to set the lat/lng fields.
  • lat and lng fields are used when rendering on Google maps view of the calendar.
  • event_display_type can be empty, “normal”, “block”, or “background”. This determines how the event shows on the calendar.
  • event_height is the height of the event in pixels, for the column view and the unscheduled panel.
  • record_id is the internal FileMaker record id of the event.

When a list of events is required, the format looks like this:

[
	{
		"id" : "1234",
		"start_date" : "01/02/2003 21:00",
		"end_date" : "01/02/2003 22:00",
		"text" : "First Event",
	}, 
	{
		"id" : "123456789",
		"start_date" : "01/02/2021 21:00",
		"end_date" : "01/02/2021 22:00",
		"text" : "Second Event",
	}, 
	...	
]

soSIMPLE Calendar fields

FileMaker Fields

soSIMPLE Calendar uses specific fields for integrating with your data. By default, these fields are mapped to the events table that comes with the Add-on. You can change them to your own fields in the soSIMPLE Calendar Actions script.

For reference, these are how events fields are used. The required fields have and * next to them:

  • Start Date* & End Date
    Date-type fields. Start date is required. If there’s no end date field, the end date will always be the same as the start date.
  • Start Time* & End Time*
    Time-type fields in FileMaker storing the start and end time.
  • Event ID field*
    Every event must have its own unique ID. If you’re showing multiple databases on your calendar, event IDs must be unique between databases. A FileMaker serial number field is usually just fine, as is FileMaker’s get(UUID).
  • Event Text field*
    This is the text of the event.
    • note: for calendars set up as “Server-side Async”, this needs to be an editable text field (not a calculation). For all otehr calendars, it can be a calculation that results in the display of each event. In those cases, you can leave the next field (“Event Text Display field”) blank.
  • Event Text Display field
    This field is not required or recommended unless you are are using “Server-side Async.” It determines what is displayed on the event. By using a calculation field, you can show any event details you’d like.
    • Tip: you can format your fields with different fonts and colors by using the FileMaker calculation function getascss(). If you don’t choose anything here, the Event Text field will be used to display your event.
  • Event Resource / Unit field
    The resource field is the where you store the name or key of the resource (a person, room, equipment, etc.).
  • Show Only Records Flag field
    This is an optional field indicating whether you’d like an event to show on the calendar. If you use this field, the calendar will only show events with a “1” in this field.
  • Event Color/Text Color field
    By specifying a color in this field in your database, you can highlight specific events in the calendar in a different color. Use web hex code (e.g. #9900FF), or standard web color names (which most colors are).
  • Read Only
    By resolving a calculation to 1 or 0 for this field, you can define specific events as read-only. This will stop you from dragging the events on the calendar. You can also use the variable in the soSIMPLE Action Script to control what happens when you double-click a readonly event.
  • Unscheduled Event FLAG
    Any records with a 1 in this field will show in the “Unscheduled” column of your calendar. This should be a regular number field, not a calculation, as that will allow you to manually drag items to and from this column from the main part of the calendar.
  • Custom Tooltip
    What will show up when you hover over an event? Unlike regular tooltips, you can add fancy formatting to your tooltip using html code in your calculation or getascss().
  • Event Location/Latitude/Longitude
    These fields work with each other when using the Map view. (Map view is in beta, and is only recommended with Server-side Async). When viewing your calendar in Map view, the latitude and longitude will determine where the event shows on the map. If these fields are empty, we will attempt to set these fields using geolocation, based on the location field.
  • Event Display Type
    Used for our “Background” feature. The value of this field can be:
    • Normal – events display as events
    • Background – events show as shaded background on calendar
    • Block – events show as shaded background and block users from creating events at the same time.
  • Event Height
    Height of the event in the “week column” view.
  • Calendar
    ID of the Calendar that the event is assigned to.
  • Recurrence ID, Recurrence Date Original, Recurrence Skip Weekend
    These fields are used when updating recurrences. If you’re integrating your own data and will be using the soSIMPLE recurrence script, you should set up these three fields in your own events table.

CALENDAR DEFAULTS

At the bottom of the Set Variable ($field_names) step, there are several “default” values.

These settings allow you to change how ALL events show up on your calendar. The field mappings above take priority, so these values will be overridden by values assigned in your FileMaker file.

  • Event Display Type: all events can show up as background or blocked events.
  • Event Color & Text Color: all events can share the same color.
  • Resource: Enter the ID of the resource you’d like these events to be assigned to and any events without a resource already assigned will show up under this resource. If you’re using Resource names instead of IDs, enter that here instead.

Integration: Overview

The soSIMPLE Calendar Add-on was designed be used as soon as you drag it onto your layout, or to be deeply and richly integrated into your own custom app.

We know that everybody’s workflow is different, and requirements vary from app to app.

The first step in deeply embedding the soSIMPLE Calendar Add-on, is to redirect what you see on the calendar. Fundamentally, you see two things on your calendar: events and resources.

EVENTS: To show your events instead of the events table that came with the Add-on, follow these instructions.

RESOURCES: To show your resources instead of the resources table that came with the Add-on, follow these instructions.

If you are using the Calendar Selection tool that’s next to the calendar, we recommend using the Calendar Names table that came with the Add-on, or use other methods to filter the calendar. With that in mind, we have also provided instructions on how to redirect Calendar Names to your table.

Beyond that, it’s all just customization work. The built-in scripts will continue to work automatically even after you redirect your data, but you may want to put your own spin on the workflow, or other logic embedded in your calendar. You do that mostly by editing the soSIMPLE Calendar Actions script.

Any other questions?

Please contact us.

Integrating your own Calendar Names

OK, first off – I don’t know if this is a good idea.

You can use your own calendar names and colors, but the easiest way to do that is to change the names in our soSIMPLE Calendar Settings layout, under “Resources & Calendars.”

A second alternative to integrating your own calendar names table, is to step back and give some more thought to how the you’d like to filter your calendar, other than this field. You can then edit the soSIMPLE Calendar Actions script to accommodate any search routine or complex filtering.

If neither of those options work for you, you can go ahead and redefine how the Calendar Selector works.

First, it’s important to understand the mechanics:

  1. Calendar names, keys and colors live in a table called “Calendar_Name.
  2. A web viewer is drawn right next to the soSIMPLE Calendar web viewer (or right below or above if you prefer – it scales nicely). The web viewer is a color-coded set of checkboxes representing each calendar name, plus an optional checkbox called “Unassigned Events”
  3. As the user clicks each checkbox, a global field is set with the key for that calendar (and any other selected). That global field is called “zg_selected_calendars.”
  4. When the calendar is refreshed or navigated, soSIMPLE Calendar Actions script is run. That script looks at zg_selected_calendars to create its find request.

To change what fields are being used to build the Selected Calendars web viewer, you have edit the calculation that builds that web viewer: “zc_Select_Calendar.”

zc_Select_Calendar builds on the contents of the field “select Calendar HTML” by adding html for each calendar. It does this all in a single calculation by using the while function to loop Calendar_Name records. To adapt this to your own table, you can change every line in the calculation that references “CALENDAR_NAME::…” with the calendar values from your own data.

Here is the calculation:

Let ([
	calendars_list = List(setting.CALENDAR_NAME::zk_P);
	calendars_selected = zg_selected_calendars;
	show_unassigned_button = not IsEmpty (Select Calendar showAllButton label);
	show_unassigned_selected = If ( FilterValues ( calendars_selected; "showunassigned" )>0;"selected";"unselected");

	html = Select Calendar HTML;

	code = Substitute ( html; "%%calendars%%";

		If ( show_unassigned_button; 
		   "<div class=\"button " & show_unassigned_selected & "\">
			<div class=\"checkbox\" id=\"showunassigned\" style=\"background-color:gray;outline-color:gray\"></div>	
			<div class=\"name\" id=\"showunassigned\">" & Select Calendar showAllButton label &"</div>
			</div>") &

			While ( 
				 //[ initialVariable ] ; condition ; [ logic ] ; result )
				 [ i = 1; result="" ];
				 i <= ValueCount ( calendars_list);
 
				 [
					id = GetNthRecord ( setting.CALENDAR_NAME::zk_P ; i );
					name = GetNthRecord ( setting.CALENDAR_NAME::Name ; i );
					color = GetNthRecord ( setting.CALENDAR_NAME::Color ; i );
					selected = If ( FilterValues ( calendars_selected; id )>0;"selected";"unselected");
					div = "<div class=\"button " & selected & "\">
					<div class=\"checkbox\" id=\"" & id & "\" style=\"background-color:" & color & ";outline-color:" & color & "\"></div>		
					  <div class=\"name\" id=\"" & id & "\">" & name & "</div>
					</div>";
					result = result & "¶" & div;
					i = i +1
				 ];

				 result
			)

		)


	];
    
    code
    
)

How are Events Loaded?

This article describes the mechanism to find and filter events to show on the calendar.

Every time the calendar loads (“load”), the refresh button is clicked (“refresh”) or the view or date is changed (“navigate”) the calendar:

  1. finds events to load using the soSIMPLE Calendar Actions script
  2. creates a JSON array of the events, and
  3. loads them on the calendar using soS Calendar Load Events script

By default, soSIMPLE Calendar uses the “Execute FileMaker Data API” script step to find events. This script step isn’t actually using the FileMaker Data API as deployed on FileMaker Server, and in fact doesn’t even require FileMaker Server. It’s named after the Data API because it uses the same underlying technology, the same query format and the same result format as this tool.

If you’re more comfortable using the “Perform Find” script step instead, you can disable this feature and just use a more standard approach, by changing the variable $use_data_api to false on line 53.

Execute FileMaker Data API

In broad strokes, this script step works like this:

  1. build a query,
  2. include the query as part of a JSON object,
  3. execute this step with the JSON object
  4. loop through the resulting JSON object to turn it into a soSIMPLE Calendar events object.
Build a query:

This describes the query steps we use in soSIMPLE Calendar Actions to get the events for the calendar using the Execute FileMaker Data API script step:

$min_date and $max_date are from the JSON script parameter. They represent the date range that’s being displayed on the calendar when the script is run.

$selected_calendars is the value of the field “soSIMPLE Calendar Settings::zg_selected_calendars”. This is a global field that is updated as calendar names are selected on the “Selected Calendars” web viewer next to the soSIMPLE Calendar. The values are foreign keys stored in each event (in our default events table, it’s in the field “zk_F_Calendar_Name”).

$selected_calendars will also include a special string “showunassigned” if “Show Unassigned Events” is checked off in the calendar selector.

The query portion for the Execute FileMaker Data API will look something like this with each request being it’s own JSON object:

[
      {
         "Date Start": "1/1/2021...2/1/2021",
         "zk_F_Calendar_Name":"1234",
         "Display FLAG": 1
      },
      {
         "Date End": "1/1/2021...2/1/2021",
         "zk_F_Calendar_Name":"1234",
         "Display FLAG": 1
      },
      ...
]

This variable is put together with the rest of the JSON used by this script step. The final result will look something like this:

{
  "layouts": "event",
  "limit" : 500,
  "offset" : 1,
  "query" : [
      {
         "Date Start": "1/1/2021...2/1/2021",
         "zk_F_Calendar_Name":"1234",
         "Display FLAG": 1
      },
      {
         "Date End": "1/1/2021...2/1/2021",
         "zk_F_Calendar_Name":"1234",
         "Display FLAG": 1
      },
      ...
  ]
}

When this script is run, you’ll get a result back that will look something like this:

{
     "response" :{
            "dataInfo":{...}, 
            "data":[...]}, 
     "messages":[...]
}

The calendar events we’re looking for are buried in response > data. (The actual data from each record is in response > data > fieldData).

Information about the results, like how many records were found, are in response > dataInfo. Finally, messages will show any errors encountered in getting the events.

So our next series of steps is looping through the result, filtering out events by Resources if we’ve selected that option (click the gear icon next to the calendar to see the Resource filter), and build a new JSON object from the result.

The JSON record set is then passed as a parameter to the script, soS Calendar Load Events in the very last step of the Actions script.

The JSON parameter is in the format:

{
   "primary_event": {<first JSON event object>}, 
   "all_events": [
        {<event object 2>},
        {<event object 3>}, 
         ...
        ],
   "effect": "load"
}

Perform Find

We’ve found Execute FileMaker Data API to be more efficient (and as a result, faster) than the alternative. But if you’re testing out different filters or trying things that would be challenging to set up in the Data API, or you’re just not comfortable using that method, then Perform Find is for you.

The overview for that method is:

  1. Open a window offscreen
  2. Go to the Events layout
  3. Create find requests for the date range, calendar, and filters.
  4. Perform Find
  5. Loop through the found set and create soSIMPLE Event object.
  6. Pass resulting JSON to the script, soS Calendar Load Events, as above.

Integrating your own Resources

Resources in soSIMPLE Calendar can represent many things in soSIMPLE Calendar. They can represent rooms, people, trucks, etc. Anything that you want to schedule and manage can be a resource.

Resources show up along the top of the calendar in a single-day Resource view and weekly Planner view, and along the left column in our highly flexible Timeline views.

Assigning Resources to Events

Typically you would assign an event to resource using a selector of some kind – like a dropdown menu, or a checkbox, for example. In soSIMPLE Calendar, you can also drag events to resource columns or rows.

Under-the-hood, your calendar Event might be using a field (let’s call it “resource”).

  1. The resource field may contain simply a text string, like “Edit Room.”
  2. In the case of checkboxes it may contain multiple lines, like “Edit Room¶Green Room.”
  3. Or it may contain a foreign key, like “123” or “123421-ksdfo-324-sdf” which relates to a foreign key in another table.
  4. Likewise, it could be a multi-key like “123¶123421-ksdfo-324-sdf”
  5. * note: if none of these apply to you, such as when you’re using a join table, create a calculation field in your event record to match one of the formats above. You will also have to edit the soSIMPLE Calendar Actions script to create and delete records in your join table.

Showing Resources in soSIMPLE Calendar

Add-on Version 1.1

NEW: starting with soSIMPLE Add-On Version 1.1, we use a value list attached to the resource field on the data source layout to determine attached resources. This will work using a checkbox set, pop-up menu or drop-down list.

When integrating into your own file, this will usually happen automatically when you (a) edit your $field_names variable to map your fields and (b) assign a value list control to the resource field (named $event_unit_field in that step).

If you want to change that behavior, the soSIMPLE Action Script builds that list using the Data API script step, beginning near line 61 where it says “## LOAD RESOURCE BASED ON VALUE LIST ##”

Add-on Version 1.0

In soSIMPLE Version 1.0 and earlier, to show the resources on your calendar soSIMPLE runs the script soS Calendar Load Resources.

This script builds resources from our “resources” table by looping through each record and adding it to a JSON array of resource records.

You can also build this array from another table, or from a value list. This is also a good opportunity to filter or sort the resource columns and rows that you’re showing on the calendar.

Underlying JSON for Resources:

The JSON resource array is a fairly simple array of records. Each record is made up of:

  • label
  • key

The label is how you want it to show on the calendar. The key is the underlying key that’s stored in the event. In the case of examples #1 & #2 above, the key and the label will be the same.

The JSON array is represented like this:

[ 
  { 
     "label":"Edit Room",
     "key":"1234",
  }, 
  { 
     "label":"Green Room",
     "key":"123421-ksdfo-324-sdf",
  }, 
    ....
]

or in the case of simple labels:

[ 
  { 
     "label":"Edit Room",
     "key":"Edit Room",
  }, 
  { 
     "label":"Green Room",
     "key":"Green Room",
  }, 
    ....
]

Then we use the “Perform Web Script” step to push that to the calendar’s web viewer.

Integrating your own Events Table

We don’t force you to use our events table, or any of our schema for that matter. The soSIMPLE Calendar Add-on was designed to be easily integrated with your own data.

This article describes how to change the table where your calendar events should come from.

  1. soSIMPLE Calendar Actions script (starting near line 14)
    1. Change the variable $data_layout_name to match the layout name that you will use for finding and editing your events in the background.
    2. (optionally) change the variable $entry_layout_name to match the name of the layout you want to see when you open an event. Leave it the way it is if you will only be using one layout for both purposes.
    3. Change the variable $field_names to match your field names. There are a lot of field names in there – if you don’t use one, just set that field variable to a blank a blank string (“”). You must use the following fields:
      • $date_start_field
      • $date_end_field
      • $time_start_field
      • $time_end_field
      • $event_id_field ( must be unique )
      • $event_details_field
      • $show_only_field
      • $tooltip_field
  2. soS Recurrences Create Update script
    1. The same 3 lines can be copied from the soSIMPLE Calendar Actions script in this script, staring around line 12.

That’s it! Now your calendar will show and edit the events from your events table.


More information:

These two scripts use indirection throughout, so that you don’t have to change all the field names and layout names throughout the script. You just change this information at the top of the script, and the rest of the script will use the script steps, “Go to Layout” by name and “Set Field by Name.”

If you change the name of the layout, you will have to change it in these two scripts.

Why two layouts?

We give you the option of using two layouts because your data entry layout may have more information on it than you need, or you may have script triggers that get in the way of doing simple searches.

By default, $data_layout_name is used to (1) find events to show on the calendar and (2) edit existing events when you drag them on the calendar (done off-screen so you don’t see it).

Also by default, $entry_layout_name is used to (1) open events when you double-click them and (2) when creating new events.

When setting $field_names, use the GetFieldName() function as shown, or use a fully-qualified field name in the format TOC::FIELD.

You are also not tied to this mechanism. You can edit this script however you’d like for your purposes. This is just a good starting point.

See article about the soSIMPLE Calendar Actions script for more information.

soSIMPLE Calendar Action Script

The soSIMPLE Calendar Actions script controls everything that happens when you do anything in the soSIMPLE Calendar object.

The script looks a little overwhelming, but don’t worry – it’s broken down very logically.

  1. Define field and layout names
  2. Get information about what action was performed from the script parameter.
  3. Perform the action.

Every time the script is run, a script parameter is included in JSON format. We turn these into local variables in step 22 of this script.

What’s the Action? $event_type

The first thing you’ll need to know is the $event_type.

The rest of the script is a series of if-else-then statements simply dependent on the $event_type. The $event_type can be one of these values:

Back to the JSON-derived variables…

The most important variable:

$event_type

$event_type describes what the calendar is doing. The remainder of the script is broken down depending on the value of this variable.

$event_type can be:

Load

The first time the calendar is loaded.

Includes:

$mode – the name of the view such as “day”, “month”, “timeline”

$date (the specific date you’ve selected)

$max_date, $min_date (the range of dates visible on the calendar)

Like Refresh and Navigate, this section finds and displays events using these parameters. It also updates the list of available resources for the calendar

Refresh

The refresh button is clicked, or “reloadAll()” is run using Run JavaScript script step

Includes:

$mode – the name of the view such as “day”, “month”, “timeline”

$date (the specific date you’ve selected)

$max_date, $min_date (the range of dates visible on the calendar)

Like Load and Navigate, this section finds and displays events using these parameters. It also updates the list of available resources for the calendar.

Navigate

Anytime you go to a new view or a new date

Includes:

$mode – the name of the view such as “day”, “month”, “timeline”

$date (the specific date you’ve selected)

$max_date, $min_date (the range of dates visible on the calendar)

Like Load and Refresh, this section finds and displays events using these parameters. This section doesn’t update the list of available resources since you’re just navigating views.

New

When you create a new record by clicking & dragging, by double-clicking, or by clicking the big orange “+” button.

Includes $start_date, $start_time, $end_date, $end_time, and $unit. ($unit is the id or name of the resource if you selected a specific resource from the calendar).

It can also include $lat, $lng, and $location if you double-click the map.

Finally, it can also include $text, if you enabled in-line editing and create a new event in week, day or resource view.

This section

  1. opens a card window,
  2. creates a new event,
  3. then pauses.

Open

When you open an existing event by double-clicking it.

Include $id – the primary key of the event.

This is usually all you need for this step, but it also includes the other variables from “New” events.

This section

  1. opens a card window,
  2. finds the event by ID,
  3. then pauses.

Edit

You edit a record by dragging it on the calendar.

Includes $id (the primary key of the event), $start_date, $start_time, $end_date, $end_time, and $unit. ($unit is the id or name of the resource if you drag to a specific resource from the calendar). These reflect where you’re dragging the event to.

It can also include $text, if you enabled in-line editing and edit an event in week, day or resource view.

This section:

  1. opens a card window off-screen,
  2. finds the event by ID,
  3. makes the changes specified, and
  4. closes the window

State

This is only called when “getState()” is run using Run JavaScript script step.

Includes:

$mode – the name of the view such as “day”, “month”, “timeline”

$date (the specific date you’ve selected),

$max_date, $min_date (the range of dates visible on the calendar)

This step is useful for using your own calendar navigation. We’ll explain that option in a future post.

Finally, update the calendar

As each event is found or updated, a JSON record is created for that event, along with any other found events or recurrences. The JSON record is then passed as a parameter to the script, soS Calendar Load Events in the very last step of the Actions script.

The JSON parameter is in the format:

{
   "primary_event": {<JSON event object>}, 
   "all_events": [
        {<event object 2>},
        {<event object 3>}, 
         ...
        ],
   "effect": "<can be refresh, delete, or load>"
}

What was installed?

What was installed:

When you selected the soSIMPLE Calendar Add-On, the following things were added to your database.

Note: Removing the Add-On removes everything that was created by the Add-On, including all the tables and scripts.

  • Tables:
    • soSIMPLE Calendar Settings
      Houses all the code required for your calendar, along with some global fields for setting configurations.
    • Events
      Sample events that show on your calendar. You can use this table, or integrate your own.
    • Calendars
      Names and colors to identify different calendars. They can be turned on & off with buttons to the left of your calendar.
    • Resources
      Names and sort order for resources. These show up as rows or columns in multiple views of your calendar.
  • Scripts:
    9 scripts are created. The most important one is:
    • soSIMPLE Calendar Actions
      Runs whenever anything happens on your calendar. Actions can include: Open, edit, delete, load, navigate, refresh
  • Value Lists:
    Several value lists have to been added to help in configuring the calendar and setting event fields.