Customizing Event Display with CSS

You can customize just about any aspect of the look & feel of soSIMPLE with the right CSS. To put in your custom CSS, go to the soSIMPLE Calendar Settings layout and click “Advanced”. Then you can paste custom CSS or custom JavaScript into those two fields.

This article will help you identify the right classes for your events in each view.

The Day, Week, and Resource (single day) views all display events similarly. The events consist of an event body (.dhx_cal_event .dhx_body) and a title header (.dhx_cal_event .dhx_title). There is also an event wrapper that wraps around the whole event (.dhx_cal_event), which you’d use for making changes to the whole event (backgrounds and borders, for example).

On these same views (Day, Week, and Resource) there are sometimes multi-day or full day events that show at the top of the calendar. Those events share a CSS class with multi-day events on the Month view, and with all of the events on Timeline views (.dhx_cal_event_line).

Many of the event CSS classes are specific to their views: events in the Month view that are not multi-day/full-day (.dhx_cal_event_clear), Grid rows (tr.dhx_grid_event), Map event rows (.dhx_grid_event.dhx_map_line) and Task List/Unscheduled Events (.tasklist-item).

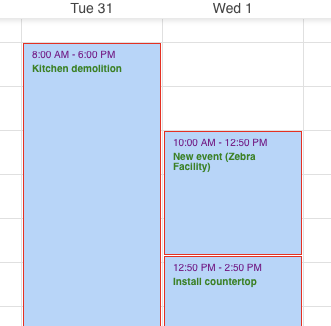
This example CSS will make your calendar look pretty… uh.. colorful… The idea was to help you identify each occurrence of your events.

 .dhx_cal_event .dhx_body{ /*day week resource body of events*/
     color:green !important;
     font-weight: 800;
     font-size:10px;
     line-height:10px;
     border:1px red solid;
     border-top:0;
 }
 .dhx_cal_event .dhx_title { /*day week resource title bar of events */
     color:purple !important;
     font-size: 10px;    
     border:1px red solid;
     border-bottom:0;
 }
 .dhx_cal_event_line { /*timeline and multi-day events */
     color:yellow !important;
     border: 2px red solid;
 }
 .dhx_cal_event_clear { /* month timed events */
     color:red !important;
     border:2px orange solid;
 }
 tr.dhx_grid_event { /*  grid event rows */
     color:green !important;
     font-size:10px;
     background-color:pink;
 }
 .dhx_grid_event.dhx_map_line { /*  map event rows and header */
     color:pink !important;
     font-size:10px;
     background-color:brown;
 }
 .tasklist-item { /* task list text contents */
     font-size: 10px;
     color:green !important;
     background-color:purple !important;  
 }

Note: the background color for events is usually set in your FileMaker event using a field and passed directly to the html element – that’s why we had to mark them as “!important” to override them here. Usually the best way of changing the background is using a FileMaker field in your event.

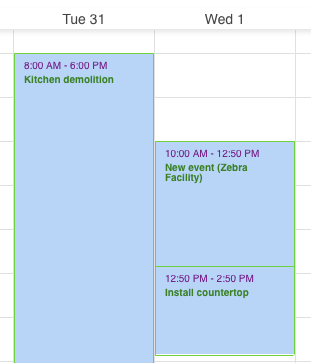
We did some fancy footwork to set the red border; we set the event body to a red border all the way around, then removed the top border, then set the event title bar to a red border all the way around, then removed the bottom border. This resulted in a seamless border all the way around both event elements. A simpler way would be to use an outline (not a border, though) around the outer event block, like this:

.dhx_cal_data div .dhx_cal_event { /* similar to border around events in one step */
     outline: green solid 1px;
     outline-style:ridge;
 } 

soSIMPLE – Get Help

If you are having any issues with soSIMPLE Calendar Add-on, please use this form to contact us. Thank you.

Google Maps key

In order to use our Google Maps integrated calendar view, you need to paste a Google Maps API key into your soSIMPLE Calendar Settings layout.

To get a key, you must log onto Google with a Google user name and password.

  1. Go to  https://developers.google.com/maps/documentation/javascript/get-api-key
  2. Scroll to the button that says “Get a Key”
    1. Click the button.
    2. Log in using a Google account, if you haven’t already.
    3. Click “Create a New Project.”
    4. Give a name to your API connection “project” so you can recognize it later. Something like “soSIMPLE Calendar” is fine.
    5. Click “Create and Enable API”
    6. Google will provide you with your new API key.
    7. Click the Copy button, or select and copy the API key.
  3. Go back to the soSIMPLE Calendar Settings table and paste the code where it says “Google API Key”
  4. Your maps should all immediately start working.

soSIMPLE Calendar Action Script

The soSIMPLE Calendar Actions script controls everything that happens when you do anything in the soSIMPLE Calendar object.

The script looks a little overwhelming, but don’t worry – it’s broken down very logically.

  1. Define field and layout names
  2. Get information about what action was performed from the script parameter.
  3. Perform the action.

Every time the script is run, a script parameter is included in JSON format. We turn these into local variables in step 22 of this script.

What’s the Action? $event_type

The first thing you’ll need to know is the $event_type.

The rest of the script is a series of if-else-then statements simply dependent on the $event_type. The $event_type can be one of these values:

Back to the JSON-derived variables…

The most important variable:

$event_type

$event_type describes what the calendar is doing. The remainder of the script is broken down depending on the value of this variable.

$event_type can be:

Load

The first time the calendar is loaded.

Includes:

$mode – the name of the view such as “day”, “month”, “timeline”

$date (the specific date you’ve selected)

$max_date, $min_date (the range of dates visible on the calendar)

Like Refresh and Navigate, this section finds and displays events using these parameters. It also updates the list of available resources for the calendar

Refresh

The refresh button is clicked, or “reloadAll()” is run using Run JavaScript script step

Includes:

$mode – the name of the view such as “day”, “month”, “timeline”

$date (the specific date you’ve selected)

$max_date, $min_date (the range of dates visible on the calendar)

Like Load and Navigate, this section finds and displays events using these parameters. It also updates the list of available resources for the calendar.

Navigate

Anytime you go to a new view or a new date

Includes:

$mode – the name of the view such as “day”, “month”, “timeline”

$date (the specific date you’ve selected)

$max_date, $min_date (the range of dates visible on the calendar)

Like Load and Refresh, this section finds and displays events using these parameters. This section doesn’t update the list of available resources since you’re just navigating views.

New

When you create a new record by clicking & dragging, by double-clicking, or by clicking the big orange “+” button.

Includes $start_date, $start_time, $end_date, $end_time, and $unit. ($unit is the id or name of the resource if you selected a specific resource from the calendar).

It can also include $lat, $lng, and $location if you double-click the map.

Finally, it can also include $text, if you enabled in-line editing and create a new event in week, day or resource view.

This section

  1. opens a card window,
  2. creates a new event,
  3. then pauses.

Open

When you open an existing event by double-clicking it.

Include $id – the primary key of the event.

This is usually all you need for this step, but it also includes the other variables from “New” events.

This section

  1. opens a card window,
  2. finds the event by ID,
  3. then pauses.

Edit

You edit a record by dragging it on the calendar.

Includes $id (the primary key of the event), $start_date, $start_time, $end_date, $end_time, and $unit. ($unit is the id or name of the resource if you drag to a specific resource from the calendar). These reflect where you’re dragging the event to.

It can also include $text, if you enabled in-line editing and edit an event in week, day or resource view.

This section:

  1. opens a card window off-screen,
  2. finds the event by ID,
  3. makes the changes specified, and
  4. closes the window

State

This is only called when “getState()” is run using Run JavaScript script step.

Includes:

$mode – the name of the view such as “day”, “month”, “timeline”

$date (the specific date you’ve selected),

$max_date, $min_date (the range of dates visible on the calendar)

This step is useful for using your own calendar navigation. We’ll explain that option in a future post.

Finally, update the calendar

As each event is found or updated, a JSON record is created for that event, along with any other found events or recurrences. The JSON record is then passed as a parameter to the script, soS Calendar Load Events in the very last step of the Actions script.

The JSON parameter is in the format:

{
   "primary_event": {<JSON event object>}, 
   "all_events": [
        {<event object 2>},
        {<event object 3>}, 
         ...
        ],
   "effect": "<can be refresh, delete, or load>"
}